Wednesday, November 18, 2015

A Sticky but Fun and EASY Project!

Daddy went to work with my keys today, which meant we were stuck at home...all day. This was a bit of a sticky situation since I had promised them an outing with their friends. So, the girls finished up their breakfast, I was frantically trying to figure out what we could do that would spark interest and excitement instead of the complaining and whining that I knew would ensue if I didn't come up with something quickly!

As I was looking through my craft supplies I spotted a roll of clear contact paper. My mind went back to Ellie's preschool classroom last week and a "sticky wall" that the kids were exploring by putting up small construction paper pieces. It clicked. I quickly cut two large Christmas tree shapes, folding the contact paper in half to make sure the trees were symmetrical. I then dug into my tissue paper stash and cut about a gazillion one-inch squares. (Maybe not quite that many, but there were a lot!)

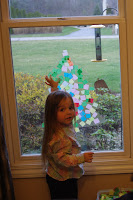
When they were ready, I peeled off the paper backing of the contact paper and used a couple of small pieces of tape to stick them to the play room windows, sticky-side exposed and ready for decorating. I placed a single square of tissue paper on one of the trees and they needed no further instructions.

They spent almost an HOUR trying to cover every last inch of the sticky tree with tissue paper.
 Not only did they have a blast, but we now have our first decorations for the upcoming season! Look how proud of their work they were!

We stepped out the front door to see the finished products from the outside looking in. I didn't have my tripod, so the picture's a little blurry, but I think it still captures the beauty.
They did such a great job! I can see many more "sticky projects" in our future. Maybe a couple of wreaths to go up on the other windows this season, hearts for Valentine's Day, clovers for Saint Patrick's Day, eggs for Easter, the options are endless! So easy and fun!

Sunday, October 4, 2015

A Perfectly Simple Princess Party

I don't know about you, but I am a Pinterest junkie. I love it. When it comes to my daughters' birthday parties, it takes everything in me NOT to create a "Pinterest Perfect" party. I want to, believe me, I do. However, my daughters are 4, 2 and not even 1. If I start creating these perfect parties now, what are they going to expect in another few years? So, for now I'm trying to keep it simple.

With that said, there is one piece of the party that I always take pride in: the cake. This year I asked Ellie what she wanted her cake to be. Her response? "I want a princess cake with Cinderella and Belle and Ariel and Aurora and Rapunzel and a castle and grass." I was sorry I had asked!! Thank goodness for Pinterest. I found my inspiration perusing the many castle cake examples pinned by dozens of other moms out there. Mine did not turn out nearly as perfect as some I saw, but Ellie's reaction told me that it was perfect to her. :)


So, reigning in my Pinterest urges, I kept the rest of the party simple. I found foam crowns at JoAnn Fabric and Craft Store and bought foam stickers to decorate them with. I put a table cloth on the floor and had a bowl of stickers for each kid to use on their crowns. As they got started I realized we needed somewhere to put all of the trash from the stickers, so that's what the big blue bowl in the middle is.
I wasn't too sure how it would go with 2 to 4-year-olds, but they did an amazing job and really got into it! They also enjoyed wearing them for the rest of the party, and that became their party favor to take home with them.
Besides the crowns, the cake and a few plates and cups, that was about it for the princess theme. We added streamers and lots of balloons and called it a party. Oh, I did recreate the monkey ball-toss from Charlotte's birthday into a "frog prince" ball toss, but that's about it. I'm telling you, at this age, all they need are one another to entertain themselves!
It was simple, fun, and the kids had a blast. Although I may have set the bar a little high for next year's cake, at least I won't be renting a pony and Ferris wheel.  :)

Wednesday, July 29, 2015

10 Fun and Clever Ways to Use Pool Noodles


I'm always looking for ways to entertain my girls, and there are so many great ideas out there!  Pool noodles are cheap and easy to find this time of year, and with so many great uses.  Here are a few clever ways we've found to put them to use:
1. Bedtime Barrier
At our house, pool noodles have become necessary for bedtime.  With our youngest just transitioning into her twin bed, I tried just a simple pool noodle, but it didn't quite cut it.  We wrapped a blanket around the noodle and stuffed it just under the fitted sheet to create a barrier so that she doesn't roll off the edge.  Works like a charm!
2. Filling the Cracks
We also had trouble with books and stuffed friends falling down the crack between the bed and the wall.  Easy fix - stuff a pool noodle down there and vuala!  No more missing toys.
3. Flower Bed
My daughters love flowers, so I thought I'd create their own garden full of blooms.  I found a rectangular basket at Michael's Craft store, bought a yard of brown felt, two pool noodles, and a variety of silk flowers.  I simply cut the noodles to fit the basket, cut the felt to cover each piece of pool noodle, and used hot glue to hold the felt in place.  I also hot glued the covered noodles into the basket so they wouldn't come out.
4. Croquet Game  by www.downhomeinspiration.com
Need some creative ideas to keep the kids busy?  Create a kids' large croquet game with some pool noodles, wooden dowels (to stick in the ground to hold the noodles in place), and a soccer or kickball.
5. Marble Run  by myhomespunthreads.blogspot.com
Cut a pool noodle in half and you've got a great marble run in seconds!  Tape one end to a chair, or lay them on the stairs to create an elevated ramp.  (For your own sanity's sake, you probably want to find a box to catch the marbles at the end.)  Find a couple of marbles stashed away and you've got yourself a game!
6. Obstacle Course  by www.learnplayimagine.com
Allison over at Learn~Play~Imagine created a great backyard obstacle course out of pool noodles and a couple other simple supplies you could find around your house.  Get those kids outside, running and laughing (all while practicing some great gross motor skills)!
7. Lacing with Water Noodles  by www.allmylittlegems.com
Stuck inside with nothing to do?  Create this quick and easy activity with nothing but pool noodles and rope.  Help kids work on gross motor skills and pattern practice while having a blast!  Want to spice it up a bit?  Try it in the tub (or a kiddie pool on a nice day)!
8. Giant Ring Toss  by www.thejoysofboys.com
Some wooden dowels, duct tape, and pool noodles and you've got yourself an easy, fun outdoor activity!  Too big for your little ones?  Cut the noodles to fit their needs.  :)
9. Door Stopper  by www.dianamattoni.com
Keep little fingers from getting slammed by doors with this easy fix.  Simply cut a section of pool noodle and slice it down one side.  Wrap it around the edge of a door and slide it up high enough where little hands can't pull it off.
10. Shopping Cart Safety  by www.itsnotalwaysblackandwhite.blogspot.com
Ingenious!  A quick, cheap and easy way to keep your little one from gnawing on the ever-filthy shopping cart.

Saturday, April 25, 2015

A Wild (but Simple!) Birthday

Once again, cardboard boxes were the main attraction at our daughter's 2nd birthday party.  C is a huge fan of animals and the zoo, so I decided to make that the theme of her birthday (that and the fact that she asked for a "Tigey" birthday cake - her favorite stuffed animal).
She's only two; I keep having to remind myself not to go too overboard with decorations and extras.  This is for HER, not me or the other parents coming over.  (Although, admittedly, I still had cards to identify the themed food...but I really tried to keep it simple!)  **We had cupcakes at the "friends" party and the Tigey cake for the family get-together.
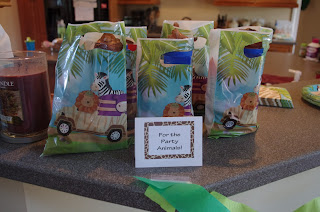
For party favors, I really wanted to give out those cute little individual boxes of animal crackers, but of course, I couldn't seem to find them anywhere!  So, I settled for a goodie bag with a couple of little animal trinkets in their along with a small bag of animal crackers.
Occupying 2-year-olds isn't too hard when you've got a couple of spare cardboard boxes lying around.  I simply covered one with the packing paper that came inside a couple of our Amazon boxes, put a stuffed lion, a cub and a few balloons in there and labeled it the "Lion's Den."
I then used a brown paper bag and drew a monkey face on it using Sharpie markers (I glued white paper on top to make the eyes).  I created a background of white with a long piece of art paper, glued it to a box and used a box-cutter to cut out the mouth.  The "monkey food" was simply a basket filled with ball-pit balls.
That was it.  Seriously...and the kids had a blast!  Food, cake and cardboard boxes was all it took.  :)

Thursday, March 19, 2015

Painting the Outdoors

We actually started out with paint, paper, smocks and an easel outside on a beautiful spring day this past week. The girls loved the new inspiration of the outdoors.
Throughout the week, however, painting the outdoors took on a whole new meaning.  For Christmas this past year, Nonna and Ga had given our family a slate garden fountain.  Looking for something to do outside the other day, I thought we could set this up together. 
The girls thoroughly enjoyed giving it their own extra touch of added rock decor and then sat back and simply took in its tranquil sound and vision.
Inspired by a conversation I'd had with my mother-in-law, I ran inside and grabbed a couple of paint brushes.  I didn't even have to explain.  The girls immersed the brushes in the water and immediately started "painting" everything in sight: the plants, the rocks, the sidewalk, our house. 
They were at it for what seemed like forever!  I finally had to coax them inside for a late lunch before nap time.  Painting with water - brilliant!  They LOVED it.  I can see a lot more of this in the future sunny days to come!

Tuesday, March 10, 2015

This One's For the Birds

With the weather finally starting to feel like spring, the girls and I needed a project to help get us in the mood even if the rain was keeping us indoors.  These two simple activities were perfect!  I'm sure you've seen them a million times, but kids love them, so why reinvent the wheel?

We first created a "Nest Helper" for the birds.  This was easy, but perfect for my almost two and three-and-a-half-year-old, and the set-up took almost no time at all.  I simply purchased a suet cage (under $2 at Home Depot) and found some leftover yarn in my crafting supplies.
To make the small pieces of yarn, I quickly wrapped the yarn around a stack of 5x7 index cards about 50 times.  I then cut through all of the strands to get 50 longer pieces of string.  They looked a little long to me, so I cut them in half again to make 100 shorter pieces. 
I repeated this with a few different colors of yarn (chosen by my girls) until we had enough yarn to fill up the suet cage with.  I mixed them all up to make a big pile for the girls to grab at and place in the cage as they wanted.
Unfortunately, I was too busy enjoying the moment to take pictures of them actually putting the yarn in, but it was a joint effort, and they had so much fun.  I was worried it'd be too simple, but they loved it and couldn't wait to go hang it out on the tree!

After that, they ran inside and my oldest said, "What's next, Mama?"  Luckily, I had the homemade bird feeders all set up to make too.  I didn't take any pictures of this activity, unfortunately, because it requires lots of hands-on attention (with the ages that I'm working with)!  I'm sure you've all familiar with the drill though: pine cones, string, peanut butter and bird seed (or raisins if you don't have seeds).

**I would have loved to have collected the pine cones as part of the activity, but it was way too wet...hopefully next time.

I tied the string on the pine cones BEFORE the peanut butter went on so as to minimize the mess.  Once the strings were on, each of my girls got a small (baby) spoon of peanut butter to spread onto their pine cones.  With a little help, they covered them with a sufficient amount.  We then rolled the peanut butter-covered pine cones in the prepared bowl of bird seed until there was no peanut butter showing and set them on a paper towel while we repeated the steps until all of our pine cones were done.
The best part was trekking out into the yard to find the perfect tree to hang our bird feeders on.  We decided to put them near the "Nest Helper" so that the birds will notice that it's there (and we can see it from our window).  The girls chose the branches and I tied the feeders onto them with the string.  It was sprinkling out, but that didn't dampen our moods at all!
After that, I got another, "What's next?"  I didn't have anything planned, but luckily we had some popcorn, a dull needle and leftover string.  Next on the list is popcorn string to hang on some of our pine trees!

Wednesday, January 21, 2015

Tips for Moving with Toddlers

Not recommended for the faint of heart!  It was a fairly rough road with a few bumps, but we made it five states over, from the great plains to the "great river."
We've been trying to prepare the girls for months, talking to them about moving and living in a new house.  Thanks to The Berenstain Bears' Moving Day book, E especially, really seemed to grasp the concept.
When we finally got to our new place, she was constantly comparing things that happened to us with the Berenstain Bears.  C, being 17-months-old, didn't quite comprehend what was going on, but has done a great job rolling with the punches.

It took five days after closing on our house (a whole separate story!), but our things finally arrived.  The night before the moving truck arrived, poor E was trying so hard, but couldn't keep it together.  She didn't understand where her things were and why it was taking so long for them to get here.  She missed her big-girl bed and her Minnie stickers for her wall.  And where were all of their toys?  C could feel the tension and was definitely missing her things too. 

The look on those girls' faces when the movers started hauling boxes and things into the house was priceless.  Even better, though, were the looks they gave as I put them down for nap in their own beds.  Both girls were more than happy, they were relieved that, in fact, Mommy and Daddy were telling the truth: their things WERE going to be coming here after all.

After going through the whole moving process with our two little ones, I came up with a few tips for moving with toddlers that I took away from the experience.  Check them out at www.playfullearning.net!

Saturday, January 10, 2015

Homemade Felt Vegetable Garden (Part 2)

Here's how I made my tomato plants (my daughter's favorite).
 You need:
  • Green felt
  • green embroidery thread (and needle)
  • 1/2 inch thick dowel cut down to about 6 inches
  • sew-on velcro
  • 3 green pipe cleaners
I didn't have a pattern to follow for the leaves, so I just sort of free-formed them. I created 3 three-leaf pieces and 3 two-leaf pieces.

I had already sewn my green tube together, so sorry I didn't get a picture of it before! I cut out a piece of felt that was 8 inches by two inches, folded it in half the "hot dog way" and sewed a quick stitch up the side and across ONE end (leaving a small opening at the other end). I then turned it right-side-out so that the seam was now on the inside.
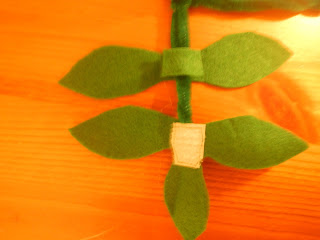
To create the shape of the tomato plant, I took the three green pipe cleaners, folded each in half, and twisted them together into the shape shown in the picture above. Don't worry about the bottom "stem" part of the pipe cleaners, that will be hidden inside of the green felt stem when you're done. If you want more branches, simply add more pipe cleaners.
Next, I cut the velcro to fit on the underside in the middle of each of the three-leaf pieces. I placed one of the pipe cleaner branches in between the three-leaf piece and the velcro, and sewed around the velcro to secure it in place. I repeated this at the end of each of the other two branches.
I then cut a small square of green felt to fit the center of the two-leaf pieces.
Placing the leaf-piece below and the small square above the pipe cleaner branch, I sewed around the square to secure the leaves in place on all three branches as well.
Here are the branches before the stem is added.
Next, I took the dowel and slid it into the green felt stem sleeve.
Once that was inside, I slid the "stem" piece of the branches down into the stem sleeve alongside the dowel.
To secure it into place I cut a small circle of green felt, placed it on top of the center of the branches and hand-stitched it to the opening of the stem sleeve. I don't have pictures of my steps for making the tomatoes because it is shown beautifully in this blog post by Et Moi Alors. It's in French, but the pictures say it all! The only change I made was to add a piece of velcro to the top of the tomato so that they could hang from the branches.
And voila! You have a beautiful tomato plant ready to be planted and harvested. :)