Wednesday, August 21, 2019

First Day of Kindergarten for #2


Today was a day that we've been preparing for all summer (longer, actually): Charlotte's first day of Kindergarten. She has been a little nervous, so we've thought of every trick that might help:

  • She got a special heart locket necklace with our pictures in it to wear around her neck so that "she's got her whole family right there inside her heart."
  • I drew two hearts on her hand and put my kisses there so that she's got all of my love right there if she needs it.
  • Tigey is stowed away in her backpack for safe keeping.
  • We did a practice run yesterday, complete with backpack and lunch all packed and ready to go (and we got there at 7:52...three minutes to spare, phew!)
Charlotte was great in the gym during announcements. I think having her big sister right there in the line close to hers really helps. 

When we walked down to her Kindergarten room, she hung up her backpack on hook #15, gave Daddy and I each a hug and then walked into her classroom.

Then she came running back out, clung to me and said, "I can't do it!" and started to cry. Daddy decided to go outside with Gabrielle (which was actually a great help). I took Charlotte into the corner and she said, "The day's just going to be too long!" I told her we'd be back there to get her before she knows it. She was still upset, so I reverted to what we used to to at preschool:
"How many high fives?"
"Eight!" So she got eight high-fives.
"How many hugs?"
"Nineteen!" So I gave her nineteen hugs.
"And how many kisses?"
"Twenty! No! One-hundred!" So I gave that sweet kindergartener one-hundred kisses all over her face. (I started counting them each individually and quickly switched to counting every ten kisses.) After showering her with her one-hundred kisses, we walked to her doorway. She said, "One more hug." I gave her one last hug and then she turned to walk into the room and I made a dash for the stairs. I heard her teacher say, "Oh, Charlotte, this way!" but I didn't look back. We did it! I dropped of my kindergartener and left her dry-eyed. Yay!!! This is what success looks like.

Sunday, July 22, 2018

Mispronunciations

There are some things that your kids do that you think you will remember forever. And some you do. However, I'm finding myself searching my mind these days for that one memory I'm dying to bring to the forefront, just slightly out of reach. So, I wanted to jot down a few things down before they too become lost in the great abyss behind my eyebrows.

Eleanore:
  • Dishelous = Delicious
  • Patteren = pattern
  • Smee me = Excuse me
  • Uncle Dangle = Uncle Daniel
  • Ah-loo = I love you
  • Chick-a-monk = Chipmunk
  • Agra = Grandma
  • New Yorick = New York (She's almost seven and still does this one some times! So cute.)

Charlotte:
  • Blurries = blueberries (and any other berry for that matter)
  • Check-up = Ketchup
  • Some fruit = Give us this day our daily bread
  • Elbow = Armpit
  • Wockie = Rockne
  • Nola = Granola
  • Farkler = Sparkler
  • Wondacks = Adirondacks
  • La-loo = I love you


Gabrielle:
  • Soom = Spoon (or fork)
  • Coc-a-dot = coconut OR polka dots (depending on whether or not we're watching Moana)
  • La-loo/Lub you = I love you
  • Sfinkler = sprinkler
  • Corn poop = Unicorn poop (thanks for that, Aunt Melinda!)
  • Bang-gos = Mangos
  • Chicken = steak, pork, chicken, meat
  • Rondacks = Adirondacks
  • We were driving past a manger scene this Christmas and we were all pointing out the different people, Mary, Jesus, Joseph, etc. Gabrielle joined in yelling, "Jo-shits! Jo-shits!"
  • Dom-bows = Doubles/twins

Friday, March 17, 2017

St. Patrick's Day Fun

I just spent the last part of my evening playing "catch the leprechaun" with my three girls. Here's how the game worked: we each took turns playing the leprechaun. The leprechaun had a pot of gold (a bowl with plastic colorful coins in it) and hid it somewhere in the basement while the rest of us created a leprechaun trap. My girls are under the assumption that you lure leprechauns in with potatoes (maybe because he's Irish?), so we used pretend potatoes as our bate.

Once the leprechaun (identified by his special green hat) was finished hiding his gold, he'd be lured in by the potatoes and we'd shut the trap door and make him tell us where he hid his pot of gold. The girls have a rainbow scarf, so that eventually came into play...the pot was buried under the couch cushions at the end of the rainbow.

I was just so amazed at the imagination of my girls and didn't want our game to end. We were having so much fun with this simple but creative game they had made up! It's these times, right now, that I want to remember forever. I want to look back on today and say, "Remember when we used to play Catch the Leprechaun?"

My heart is smiling today.

Thursday, May 19, 2016

Not Just a Pretty Dress

Today was Eleanore's last day of preschool this year, so naturally she wanted to wear her nicest dress for the occasion. Afterward, to celebrate, we went to Highbanks Metro Park for a picnic lunch. This is one has a natural park area with large sticks and logs to build, climb and play with. We hadn't been to this part of the park yet, so the girls were pretty excited to check it out.
They couldn't finish their lunch fast enough to get up and explore. They started playing in the teepee made of sticks, building it by adding more sticks, and hammering away to make it more "sturdier."
Then they gave the big logs a try, Charlotte first, then Eleanore joining in. Once they gained confidence, they moved on to the bigger log and took turns jumping off.

At the "Five more minutes," call they decided they wanted to get really bold and climb the teepee.
I helped them find places to put their feet a few times, but for the most part they did it themselves.
I loved sitting back and watching them tackle obstacles and push themselves further than they thought they could go (sometimes further than I thought they could go!). My girls may like wearing skirts that twirl, but they are so much more than just a pretty dress.

Wednesday, November 18, 2015

A Sticky but Fun and EASY Project!

Daddy went to work with my keys today, which meant we were stuck at home...all day. This was a bit of a sticky situation since I had promised them an outing with their friends. So, the girls finished up their breakfast, I was frantically trying to figure out what we could do that would spark interest and excitement instead of the complaining and whining that I knew would ensue if I didn't come up with something quickly!

As I was looking through my craft supplies I spotted a roll of clear contact paper. My mind went back to Ellie's preschool classroom last week and a "sticky wall" that the kids were exploring by putting up small construction paper pieces. It clicked. I quickly cut two large Christmas tree shapes, folding the contact paper in half to make sure the trees were symmetrical. I then dug into my tissue paper stash and cut about a gazillion one-inch squares. (Maybe not quite that many, but there were a lot!)

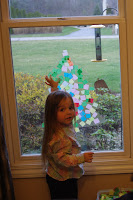
When they were ready, I peeled off the paper backing of the contact paper and used a couple of small pieces of tape to stick them to the play room windows, sticky-side exposed and ready for decorating. I placed a single square of tissue paper on one of the trees and they needed no further instructions.

They spent almost an HOUR trying to cover every last inch of the sticky tree with tissue paper.
 Not only did they have a blast, but we now have our first decorations for the upcoming season! Look how proud of their work they were!

We stepped out the front door to see the finished products from the outside looking in. I didn't have my tripod, so the picture's a little blurry, but I think it still captures the beauty.
They did such a great job! I can see many more "sticky projects" in our future. Maybe a couple of wreaths to go up on the other windows this season, hearts for Valentine's Day, clovers for Saint Patrick's Day, eggs for Easter, the options are endless! So easy and fun!

Sunday, October 4, 2015

A Perfectly Simple Princess Party

I don't know about you, but I am a Pinterest junkie. I love it. When it comes to my daughters' birthday parties, it takes everything in me NOT to create a "Pinterest Perfect" party. I want to, believe me, I do. However, my daughters are 4, 2 and not even 1. If I start creating these perfect parties now, what are they going to expect in another few years? So, for now I'm trying to keep it simple.

With that said, there is one piece of the party that I always take pride in: the cake. This year I asked Ellie what she wanted her cake to be. Her response? "I want a princess cake with Cinderella and Belle and Ariel and Aurora and Rapunzel and a castle and grass." I was sorry I had asked!! Thank goodness for Pinterest. I found my inspiration perusing the many castle cake examples pinned by dozens of other moms out there. Mine did not turn out nearly as perfect as some I saw, but Ellie's reaction told me that it was perfect to her. :)


So, reigning in my Pinterest urges, I kept the rest of the party simple. I found foam crowns at JoAnn Fabric and Craft Store and bought foam stickers to decorate them with. I put a table cloth on the floor and had a bowl of stickers for each kid to use on their crowns. As they got started I realized we needed somewhere to put all of the trash from the stickers, so that's what the big blue bowl in the middle is.
I wasn't too sure how it would go with 2 to 4-year-olds, but they did an amazing job and really got into it! They also enjoyed wearing them for the rest of the party, and that became their party favor to take home with them.
Besides the crowns, the cake and a few plates and cups, that was about it for the princess theme. We added streamers and lots of balloons and called it a party. Oh, I did recreate the monkey ball-toss from Charlotte's birthday into a "frog prince" ball toss, but that's about it. I'm telling you, at this age, all they need are one another to entertain themselves!
It was simple, fun, and the kids had a blast. Although I may have set the bar a little high for next year's cake, at least I won't be renting a pony and Ferris wheel.  :)

Wednesday, July 29, 2015

10 Fun and Clever Ways to Use Pool Noodles


I'm always looking for ways to entertain my girls, and there are so many great ideas out there!  Pool noodles are cheap and easy to find this time of year, and with so many great uses.  Here are a few clever ways we've found to put them to use:
1. Bedtime Barrier
At our house, pool noodles have become necessary for bedtime.  With our youngest just transitioning into her twin bed, I tried just a simple pool noodle, but it didn't quite cut it.  We wrapped a blanket around the noodle and stuffed it just under the fitted sheet to create a barrier so that she doesn't roll off the edge.  Works like a charm!
2. Filling the Cracks
We also had trouble with books and stuffed friends falling down the crack between the bed and the wall.  Easy fix - stuff a pool noodle down there and vuala!  No more missing toys.
3. Flower Bed
My daughters love flowers, so I thought I'd create their own garden full of blooms.  I found a rectangular basket at Michael's Craft store, bought a yard of brown felt, two pool noodles, and a variety of silk flowers.  I simply cut the noodles to fit the basket, cut the felt to cover each piece of pool noodle, and used hot glue to hold the felt in place.  I also hot glued the covered noodles into the basket so they wouldn't come out.
4. Croquet Game  by www.downhomeinspiration.com
Need some creative ideas to keep the kids busy?  Create a kids' large croquet game with some pool noodles, wooden dowels (to stick in the ground to hold the noodles in place), and a soccer or kickball.
5. Marble Run  by myhomespunthreads.blogspot.com
Cut a pool noodle in half and you've got a great marble run in seconds!  Tape one end to a chair, or lay them on the stairs to create an elevated ramp.  (For your own sanity's sake, you probably want to find a box to catch the marbles at the end.)  Find a couple of marbles stashed away and you've got yourself a game!
6. Obstacle Course  by www.learnplayimagine.com
Allison over at Learn~Play~Imagine created a great backyard obstacle course out of pool noodles and a couple other simple supplies you could find around your house.  Get those kids outside, running and laughing (all while practicing some great gross motor skills)!
7. Lacing with Water Noodles  by www.allmylittlegems.com
Stuck inside with nothing to do?  Create this quick and easy activity with nothing but pool noodles and rope.  Help kids work on gross motor skills and pattern practice while having a blast!  Want to spice it up a bit?  Try it in the tub (or a kiddie pool on a nice day)!
8. Giant Ring Toss  by www.thejoysofboys.com
Some wooden dowels, duct tape, and pool noodles and you've got yourself an easy, fun outdoor activity!  Too big for your little ones?  Cut the noodles to fit their needs.  :)
9. Door Stopper  by www.dianamattoni.com
Keep little fingers from getting slammed by doors with this easy fix.  Simply cut a section of pool noodle and slice it down one side.  Wrap it around the edge of a door and slide it up high enough where little hands can't pull it off.
10. Shopping Cart Safety  by www.itsnotalwaysblackandwhite.blogspot.com
Ingenious!  A quick, cheap and easy way to keep your little one from gnawing on the ever-filthy shopping cart.